![]()

![]()
You can import the user details from Microsoft On-Premise and Google Active Directory into the SUMMIT database. You can bulk import user details, such as NT Login ID, User Name, Employee ID, E-mail ID, Employee Photograph, Customer, Country, and so on at a time.

 Microsoft
On-Premise
Microsoft
On-Premise
To import users from Microsoft Active Directory:
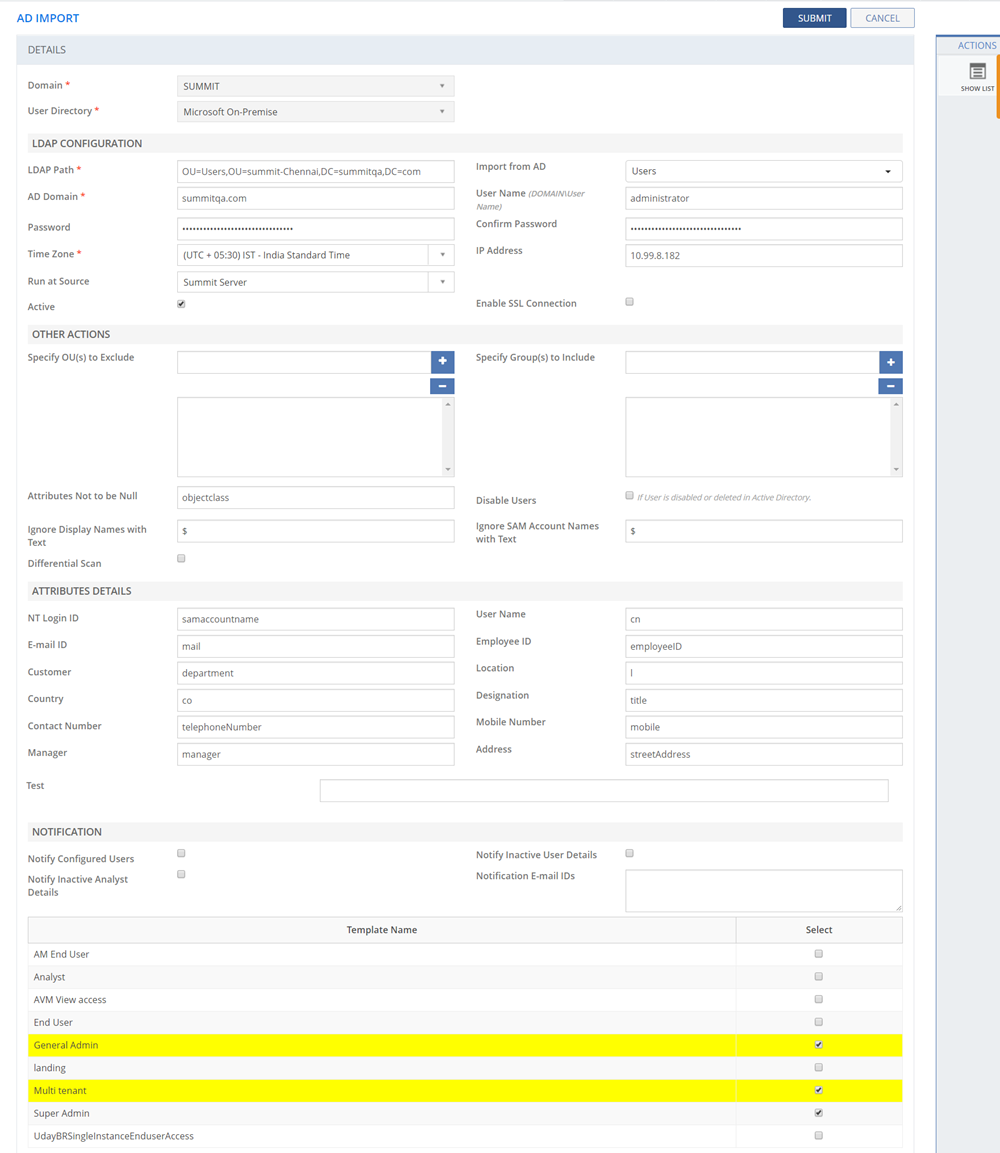
Figure: AD IMPORT page
The following table describes the fields on the AD IMPORT page:
| Field | Description |
| LDAP (Lightweight Directory Access Protocol) Configuration: | |
| LDAP Path | Specify the path name of the Active Directory
database.
Note:
|
| Import from AD | Select the required options you want to
import from the Active Directory.
Users: Select Users to import all the users available in the AD. Groups: Select Groups to import all the groups available in the AD. Deleted Objects: Select Deleted Objects to import all the deleted objects, such as users or groups from the AD. |
| Domain | Specify the Domain name of which you want to import the user details to the Application. The Domain name is the abbreviation of the company name. |
| User Name (DOMAIN\User Name) | Specify the domain user name. For example, Domain\username |
| Password | Type in the password. |
| Confirm Password | Re-enter the password for confirmation. |
| Time Zone | Select a Time Zone from the drop-down list. The selected Time Zone is the default Time Zone for all the users. You can configure the Time Zone in COMMON MASTERS page by using the Master Type, Link Thresholds. For more information about how to configure the Time Zone, see Configuring Common Masters . If a Time Zone is mapped to a specific location, the mapped Time Zone is displayed in the Time Zone drop-down list. Note: You must do the AD import after selecting the Time Zone. |
| IP Address | Specify the IP address of the machine if Proxy Server is configured in the demilitarized zone (DMZ). |
| Run at Source | Lists the configured monitoring source type.
Select one of the monitoring source. Based on the selected option, the job types are displayed in the list box. |
| Run at Proxy | This field is displayed if Run at Source is selected as SUMMIT Proxy. Select the configured Proxy Server from the list by which the AD Import job should run. |
| Enable SSL Connection |
|
| Active | Indicates the status set for the Active Directory configuration details.
|
| OTHER ACTIONS | |
| Specify OU(s) to exclude | Specify the organizational units that you wish to exclude from importing to the SUMMIT application. |
| Specify Group(s) to include | Specify the Groups that you want to include. You can add more than one Group. |
| Attributes Not to be Null | Specify the attributes for which the value should not be Null while importing data from the Active Directory database. For example: Object Class. |
| Disable Users | Indicates the status set for the user.
|
| Clear NT ID | If selected, the NT ID of deleted users are cleared from AD. This option should be selected only for deleted users and not disabled users. |
| Clear Email ID | If selected, the Email ID of deleted users are cleared from AD. This option should be selected only for deleted users and not disabled users. |
| Ignore Display Names With Text | Specify the keywords to ignore the user names with the specified keywords while importing data from Active Directory to Summit. If the specified keywords are present in the User’s Display Name text, the user data is ignored while importing data from Active Directory to SUMMIT. |
| Ignore the SAM Account Names with text | Specify the keywords to ignore the SAM Account Names with the specified keywords while importing data from the Active Directory to SUMMIT. If the specified keywords are present in the SAM Account Name (NT Login ID), the user data is ignored while importing data from Active Directory to SUMMIT. |
| Differential Scan | In differential scan process, the machine is scanned for any changes in the Active Directory progressively. All the changes that are updated in the Active Directory after the previous scan are displayed. |
| Full Scan Frequency | Specify the frequency at which the full scan is scheduled. |
| ATTRIBUTES DETAILS | |
| NT Login ID | By default, the standard attribute for NT Login ID is displayed. You can modify the data as specified by the Administrator, if required. |
| User Name | By default, the standard attribute for the user name is displayed. You can modify the user name as specified by the Administrator, if required. |
| E-mail ID | By default, the standard attribute for the user e-mail id is displayed. You can modify the user e-mail id as specified by the Administrator, if required. |
| Employee ID | By default, the standard attribute for the employee id is displayed. You can modify the employee id as specified by the Administrator, if required. |
| Customer | By default, the standard attribute for the customer is displayed. You can modify the customer as specified by the Administrator, if required. |
| Location | By default, the standard attribute for the location is displayed. You can modify the location as specified by the Administrator, if required. For multiple locations, concatenate the locations in this format: Location 1+;+Location 2. |
| Country | By default, the standard attribute for the country is displayed. You can modify the country as specified by the Administrator, if required. |
| Designation | By default, the standard attribute for the designation is displayed. You can modify the designation as specified by the Administrator, if required. |
| Contact Number | By default, the standard attribute for the contact number is displayed. You can modify the contact number as specified by the Administrator, if required. |
| Mobile Number | By default, the standard attribute for the mobile number is displayed. You can modify the mobile number as specified by the Administrator, if required. |
| Manager | By default, the standard attribute for the manager is displayed. You can modify the manager name as specified by the Administrator, if required. |
| Address | By default, the standard attribute for the address is displayed. You can modify the address as specified by the Administrator, if required. |
| NOTIFICATION | |
| Notify Configured Users | Select the check box to send e-mail notifications to the configured recipients in the Notification E-mail IDs field. The e-mail notifications are sent when the AD is successfully imported/failed to import/error while importing, respectively. Example: If the AD Import job has not run because the server is down, the recipients are notified. |
| Notify Inactive User Details | Select the check box to send notification e-mails to notify the Administrators regarding the users who are deactivated/ deleted from the AD. |
| Notify Inactive Analyst Details | Select the check box to send e-mail notifications to notify the Administrators when the Analysts are deactivated/deleted from the AD. These Analysts are displayed as inactive Analysts in the SUMMIT application. |
| Notification E-mail IDs | Specify the e-mail ids of the Analysts to send the notification e-mails. |
| Select Templates |
|
| Note: To import an Employee Photograph, ensure that the job, USERIMAGEIMPORTAD is running on the CUSTOM SCHEDULER page. For more information on how to run a job on CUSTOM SCHEDULER page, see Configuring Custom Scheduler. |
Google
To import users from Google Active Directory:
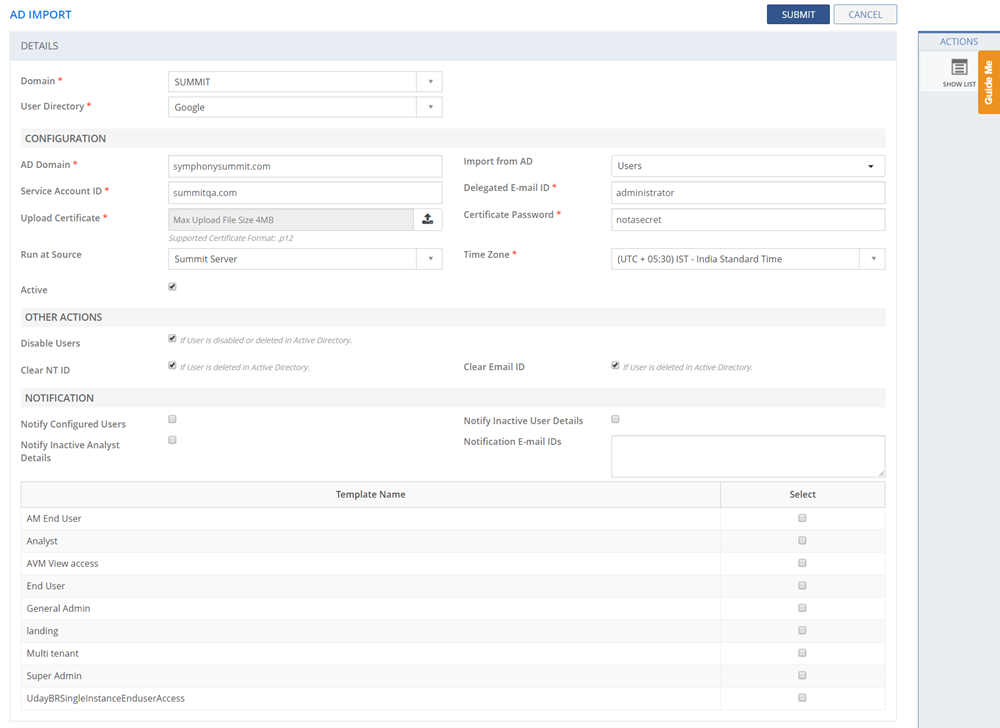
Figure: AD IMPORT page
The following table describes the fields on the AD IMPORT page:
| Field | Description |
| CONFIGURATION: | |
| AD Domain | Specify the Domain name from which you want to import the user details to the Application. The Domain name is the abbreviation of the company name. |
| Import from AD | Select the required options you want to
import from the Active Directory.
Users: Select Users to import all the users available in the AD. Deleted Objects: Select Deleted Objects to import all the deleted objects, such as users or groups from the AD. |
| Service Account ID | Specify the Service Account ID. You can create a Service Account in the Service Accounts section on the IAM & Admin page in your G-Suite. |
| Delegated E-mail ID | Specify the delegated E-mail ID. You can create a delegated E-mail ID from the Security section on the Admin Console in your G-Suite. |
| Upload Certificate | Upload the Certificate you have downloaded from G-Suite. Allowed Extension is .p12 only. |
| Certificate Password | Specify the Certificate Password. You can generate a Private Key while creating Service Account in your G-Suite. |
| Run at Source | Lists the configured monitoring source type.
Select one of the monitoring source. Based on the selected option, the job types are displayed in the list box. |
| Time Zone | Select a Time Zone from the drop-down list. The selected Time Zone is the default Time Zone for all the users. You can configure the Time Zone in COMMON MASTERS page by using the Master Type, Link Thresholds. For more information about how to configure the Time Zone, see Configuring Common Masters . If a Time Zone is mapped to a specific location, the mapped Time Zone is displayed in the Time Zone drop-down list. Note: You must do the AD import after selecting the Time Zone. |
| Active | Indicates the status set for the Active Directory configuration details.
|
| OTHER ACTIONS | |
| Disable Users | Indicates the status set for the user.
|
| Clear NT ID | If selected, the NT ID of deleted users are cleared from AD. This option should be selected only for deleted users and not disabled users. |
| Clear Email ID | If selected, the Email ID of deleted users are cleared from AD. This option should be selected only for deleted users and not disabled users. |
| NOTIFICATION | |
| Notify Configured Users | Select the check box to send e-mail notifications to the configured recipients in the Notification E-mail IDs field. The e-mail notifications are sent when the AD is successfully imported/failed to import/error while importing, respectively. Example: If the AD Import job has not run because the server is down, the recipients are notified. |
| Notify Inactive User Details | Select the check box to send e-mail notifications to notify the Administrators regarding the users who have been deactivated/ deleted from the AD. |
| Notify Inactive Analyst Details | Select the check box to send notification e-mails to notify the Administrators when the Analysts are deactivated/deleted from the AD. These Analysts are displayed as inactive Analysts in the SUMMIT application. |
| Notification E-mail IDs | Specify the e-mail ids of the Analysts to send the notification e-mails. |
| Select Templates |
|
| Note: To import an Employee Photograph, ensure that the job, USERIMAGEIMPORTAD is running in the CUSTOM SCHEDULER page. For more information on how to run a job on CUSTOM SCHEDULER page, see Configuring Custom Scheduler. |
This section explains all the icons displayed on the ACTIONS panel of the AD IMPORT page.
SHOW LIST
Click SHOW LIST to display the LIST table showing all the Active Directories configured in the SUMMIT application.

Figure: AD IMPORT: List of active directories
| Note: When the configured Active Directories are displayed under the LIST table, the ADD NEW action is displayed on the ACTIONS panel. Click ADD NEW to add a new Active Directory configuration for importing user details. |
MAPPING
Click MAPPING to map the Users that are mapped to the Groups on the AD IMPORT page to a specific User Type that belongs to a specific module. The AD IMPORT USERS MAPPING pop-up page is displayed.
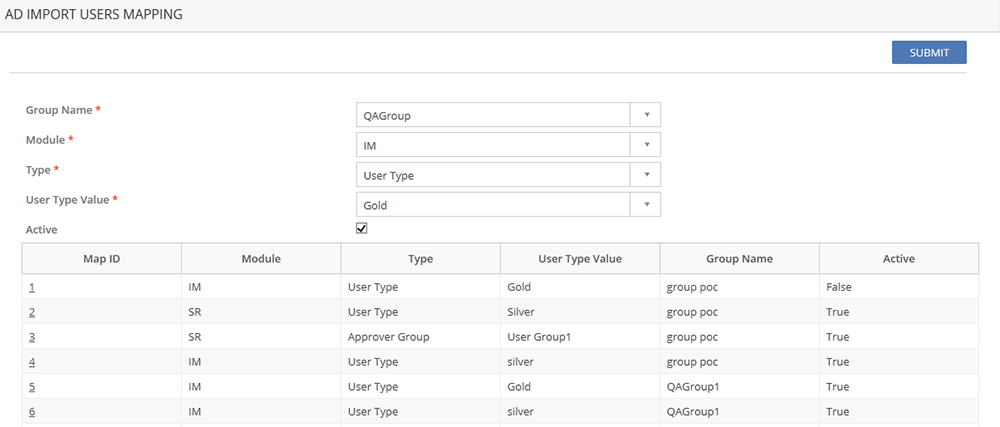
Figure: AD IMPORT USERS MAPPING pop-up page
The following table describes the fields on the AD IMPORT USERS MAPPING pop-up page:
| Field | Description |
| Group Name | Select the Group Name from the drop-down list. The Group Names are displayed based on the configuration of the Groups on the AD IMPORT page. |
| Module | Select the Module from the drop-down list. |
| Type | Select the Type from the drop-down list. |
| User Type Value | Select the User Type Value from the drop-down list. |
| Active | Select Active if the mapping is in Active status. |
Published on 21st September 2018, v5.7 SP2
© 2018 SUMMIT Software Inc. All Rights Reserved.