

Using the Custom Scheduler you can enable or disable a specific job, which is defined to perform certain tasks. You can enable monitoring and execution of tasks without any human intervention at the scheduled date and time. For configuring Custom Scheduler, you need to add or modify the jobs.
To add a job:
Click SUBMIT. New job for the Custom Scheduler is configured.

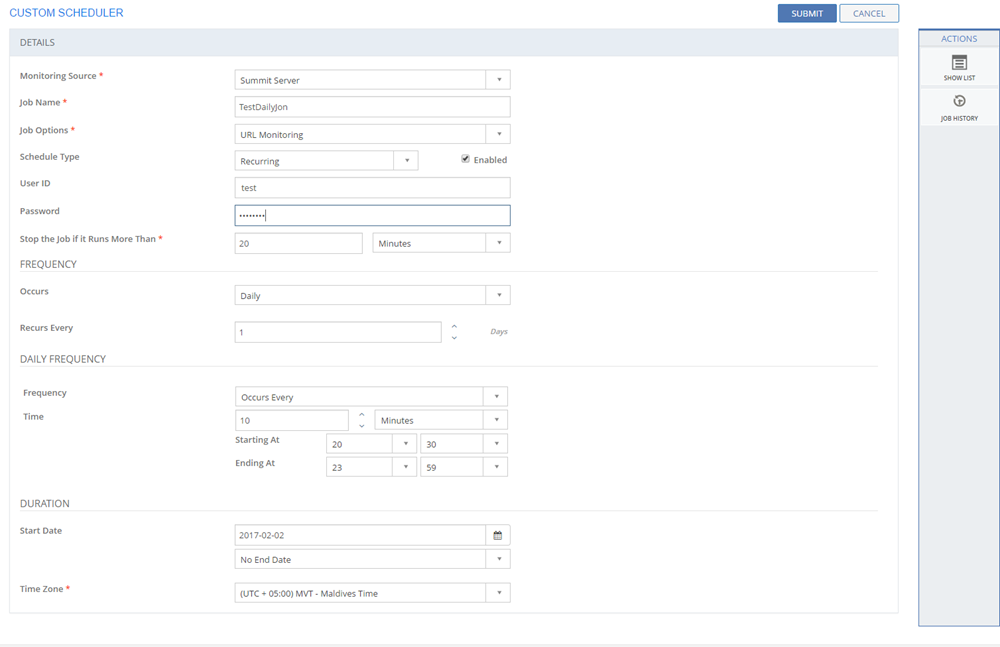
Figure: CUSTOM SCHEDULER page
The following table describes the fields on the CUSTOM SCHEDULER page:
| Fields | Description |
| DETAILS | |
| Monitoring Source | Select the monitoring source type.
|
| Run at Proxy | If Monitoring Source is selected as Proxy Server, this field is displayed. Lists the Proxy Server names that are configured in the Proxy Agent tool. Select a Proxy Server from which you want to execute the monitoring operations. |
| Job Name | Type in a job name. |
| Job Options | Select a job type from the list. Note: Based on the selected monitoring source type, a set of job options are displayed in this field. |
| Schedule Type | Select a schedule type from the list.
|
| User ID | Type in the configured Summit Server or Proxy Server User ID using which you want to execute the job. If the User ID is not specified, the job is executed with the system default User ID. |
| Password | Type in the password of the specified user. |
| Stop the job if it runs more than | If this option is selected, the selected job comes to a halt after the scheduled time elapses. Even if the job is not completely executed, the job stops. Type in the duration after which the job execution should come to a halt. |
| FREQUENCY | |
| Occurs |
|
Daily Frequency |
Select a value from the list.
|
| Start Date | Type in the start date for running the job. You can also use the Calendar icon to select an appropriate date. |
| End Date | If you select End Date, specify the date when the job should stop executing. |
| No End Date | If you select No End Date, the job continues to execute. |
| Time Zone | Select a Time Zone from the list. |
This section explains all the icons displayed on the ACTIONS panel of the CUSTOM SCHEDULER page.
Filters
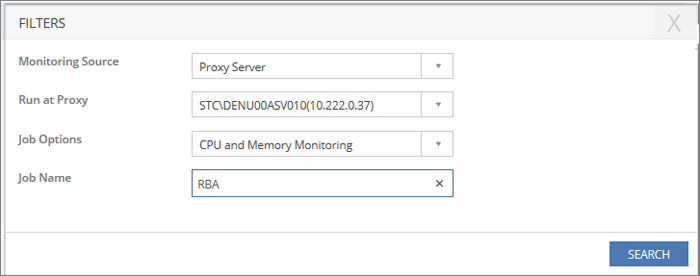
Click the Filters icon to specify a particular filter criteria to display the jobs. On clicking the Filters icon, the FILTERS pop up page is displayed. Specify the filter criteria and click SEARCH.

Figure: FILTERS pop-up page
The following table describes the fields on the FILTERS page:
| Fields | Description |
| Monitoring Source | Select a monitoring source from the list as Summit Server or Proxy Server. Based on the option selected the other fields are displayed on the FILTERS pop-up page. |
| Run at Proxy | Select a Proxy Server from the list. |
| Job Options | Select a job option from the list. |
| Job Name | Select a job name from the list. |
SHOW LIST
Click SHOW LIST to display the LIST table showing all the jobs configured in the SUMMIT application.

Figure: CUSTOM SCHEDULER page: List of jobs for Custom Scheduler
| Note: When the jobs are displayed under the LIST table, the ADD NEW action is displayed on the ACTIONS panel. Click ADD NEW to add a new job. |
HISTORY
Click HISTORY to view job details, such as Job Name, Job Status, Job Initiator, Message, Duration, and so on. On clicking the HISTORY icon, the JOB HISTORY pop up page is displayed. Specify the filter criteria and click SEARCH button to view job details. The following table describes the fields on the JOB HISTORY page:

Figure: JOB HISTORY page
The following table describes the fields on the JOB HISTORY pop-up page:
| Fields | Description |
| DETAILS | |
| Job Name | Select the job name from the list. |
| From Name | Specify the date range for search criteria. You can also click the Calendar icon to select an appropriate date. |
| To Date | Specify the date range for search criteria. You can also click the Calendar icon to select an appropriate date. |
| Job Name | Displays the job name. |
| Job Status | Displays the status of the job. |
| Last Run Date | Displays the last date and time on which the job was executed. |
| Job Initiator | Displays the Job Initiator name. |
| Message | Displays the message of a job. |
| Duration | Displays the duration taken to execute the scheduled job. |
REFRESH JOBS
Click the REFRESH JOBS icon to refresh and display the updated Customer Scheduler list.