![]()

![]()
You can configure Notification Parsing so that Incidents can be automatically logged from the e-mails/ Whatsapp messages received from a configured Mailbox (see: Configuring Mailbox). This is more suitable where one or more system Alert e-mails keep flowing into the mailbox regarding the server status or storage device status, and so on. For more information about E-mail Parsing, see E-mail Parsing.
To configure Notification Parser:
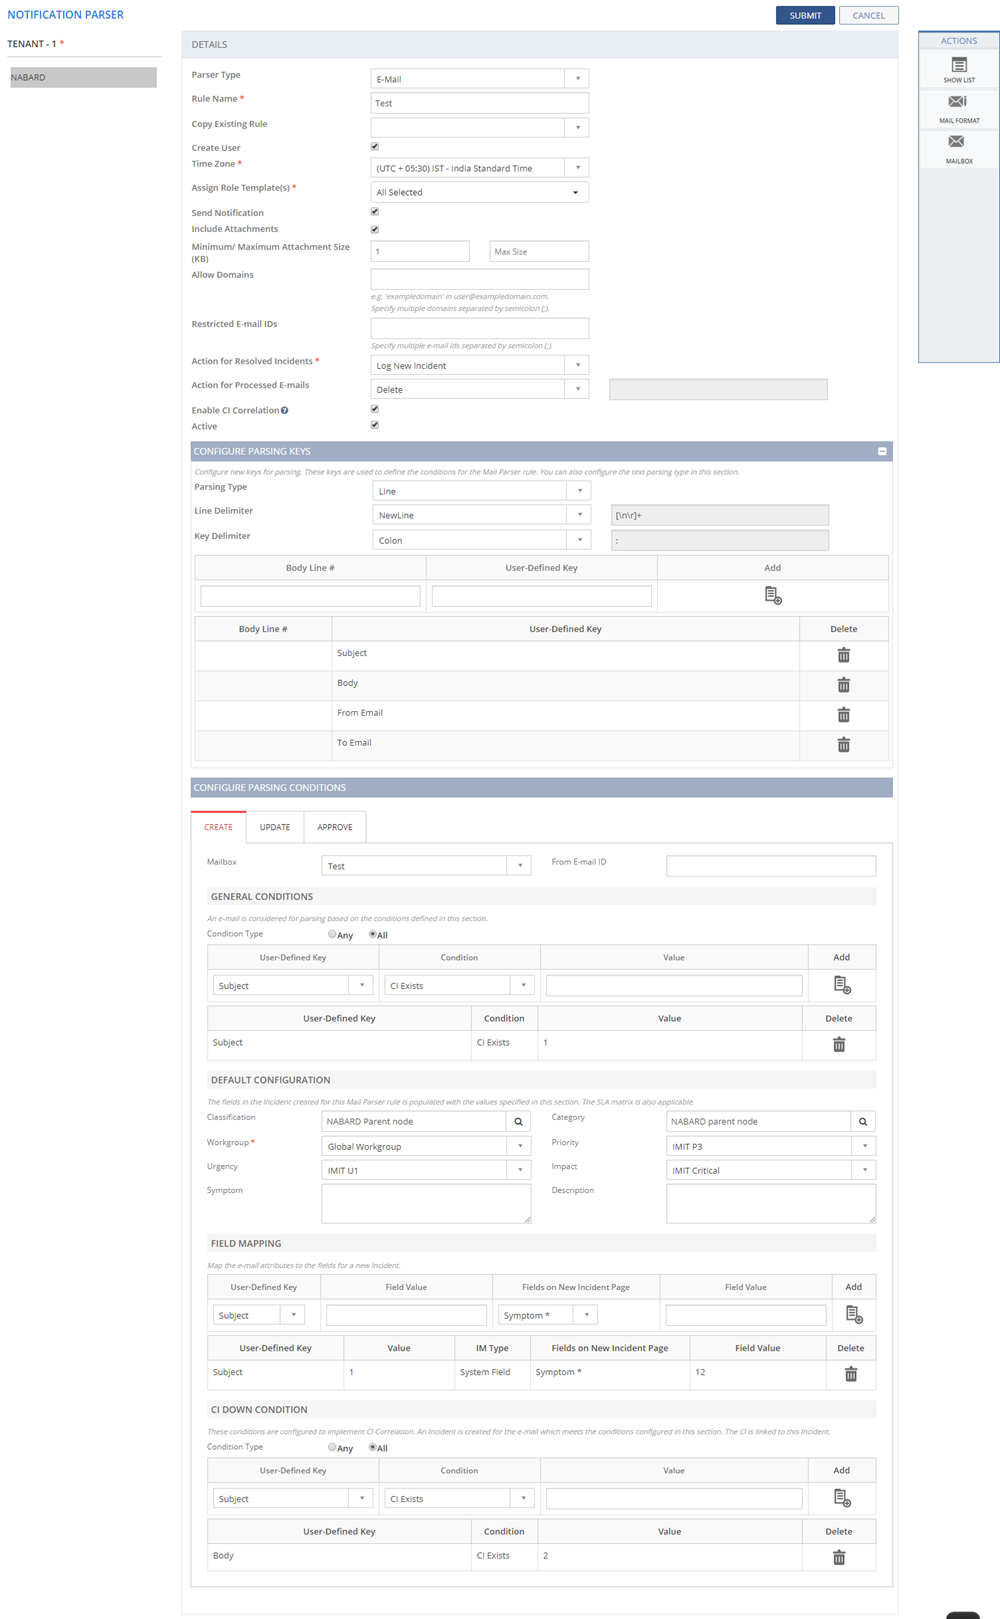
Figure: NOTIFICATION PARSER page
The following table describes the fields on the NOTIFICATION PARSER page:
| Field | Description |
| DETAILS | |
| Parser Type | Select the Notification Parser type: Email, WhatsApp |
| Rule Name | Type in a unique rule name. You can specify multiple rule names for a Tenant. The newly configured rule name gets appended to the Copy Existing list. Note: A rule name can contain alphanumeric characters. |
| Copy Existing Rule | Lists the configured rule names for a Tenant. If you wish to use the existing rule, select the rule name from the list. A confirmation message is displayed: "Do you want to use the selected rule details to create new rule?" Click OK. The selected rule name is displayed as Copy of <Rule Name> value in the Rule Name field. This can be renamed. |
| Create User | If selected, a user is created whenever the User ID is not available in the User list for the configured e-mail ID. For example, if you specify the e-mail ID as ‘xyz@anzcorporation.com’, and if the ‘xyz’ user is not present, the application creates the user as xyz. By default, the access is given for IM module for the newly created User ID. |
| Time Zone | Select the time zone to which the new users have to be assigned. This field is displayed only when the Create User check box is active. |
| Assign Role Template(s) | Select the Role Template to which the new users have to be assigned. This field is displayed only when the Create User check box is active. |
| Send Notification | If selected, an e-mail notification with login credentials is sent to the newly created user. This check box is displayed only when the Create User check box is active. |
| Minimum/Maximum Attachment Size (KB) | Specify the minimum and maximum size of the attachment in kb. |
| Allow Domains | Specify the domain names for which the issue-related-e-mails are generated as an Incident. |
| Restricted E-mail IDs | Specify the restricted e-mail ids for which the Incidents are not generated. |
| Action for Resolved Incident | If the e-mail is received for a resolved Incident, select an action from the list. |
| Action for Processed E-Mails | Select an action from the drop-down list that you want to perform on the processed e-mails. You can either delete the processed e-mails or move them to specific folder. If you select Move to Folder from the drop-down list, you can type the folder name in the text box that is available with the Action for Processed E-Mails drop-down box. |
| Enable CI Correlation | If selected, the CI Correlation configuration becomes active. |
| Active | If selected, the Notification Parser configuration becomes active. |
| CONFIGURE PARSING KEYS | |
Parsing Type |
Lists the configured e-mail types:
|
| Line Delimiter | Lists the configured line delimiter. Select the line delimiter from the list. By default, New Line option is selected. If you select Others, type in the character that has to be considered as a line delimiter in the text. |
| Key Delimiter | Lists the configured key delimiter. Select the key delimiter from the list. By default, Colon option is selected. If you select Others, type in the character that has to be considered as a key delimiter in the text box. |
| Body Line # | Type in the line number that contains the key.
|
User-Defined Key |
Specify an e-mail template name for the key value. By default, you can view Subject and Body as system defined templates. As per the needs of e-mail parsing, you can add more templates to the list. |
| Delete icon | Click the Delete icon to delete the templates Keys. |
 icon icon |
Click the |
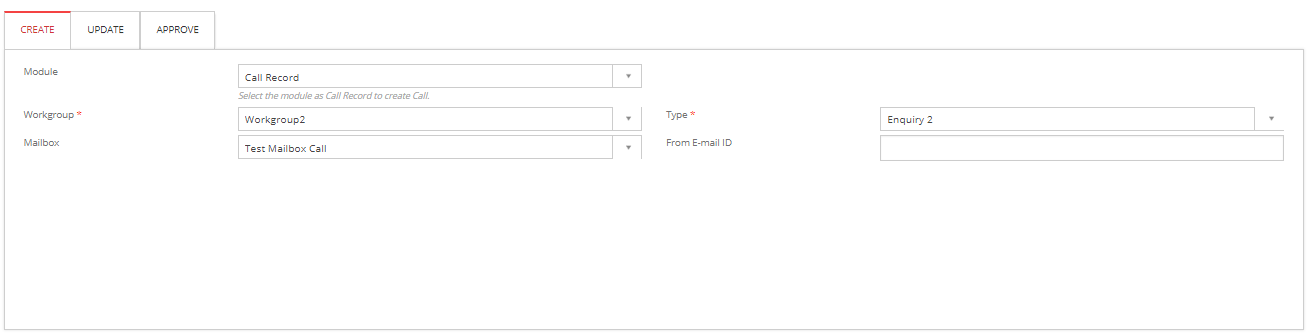
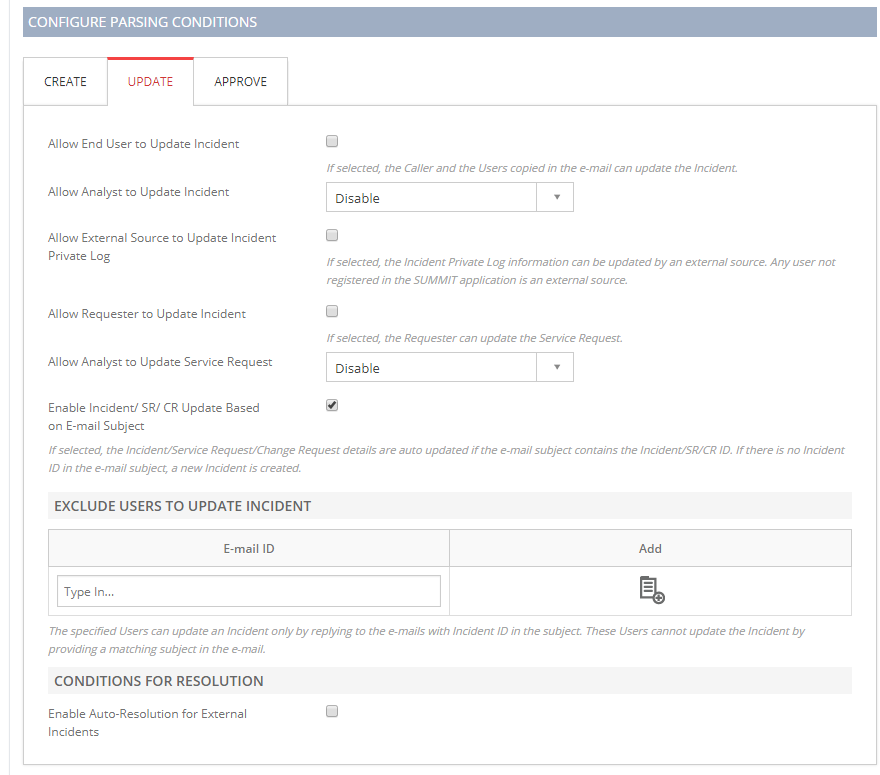
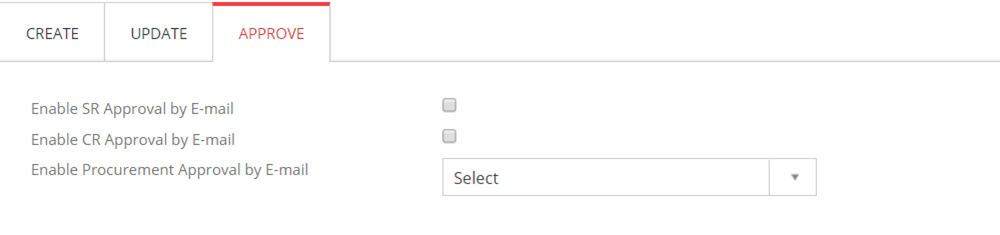
CONFIGURING PARSING CONDITIONS
 CREATE TabUPDATE TabAPPROVE
Tab
CREATE TabUPDATE TabAPPROVE
Tab
This section explains all the icons displayed on the ACTIONS panel of the MAIL PARSER page.
SHOW LIST
Click SHOW LIST to display the LIST table showing all the configured Notification Parser details for the selected Tenant.

Figure: NOTIFICATION PARSER page: List of Notification Parsers
| Note: When the Notification Parser details are displayed under the LIST table, the ADD NEW action is displayed on the ACTIONS panel. Click ADD NEW to configure a new Notification Parser. |
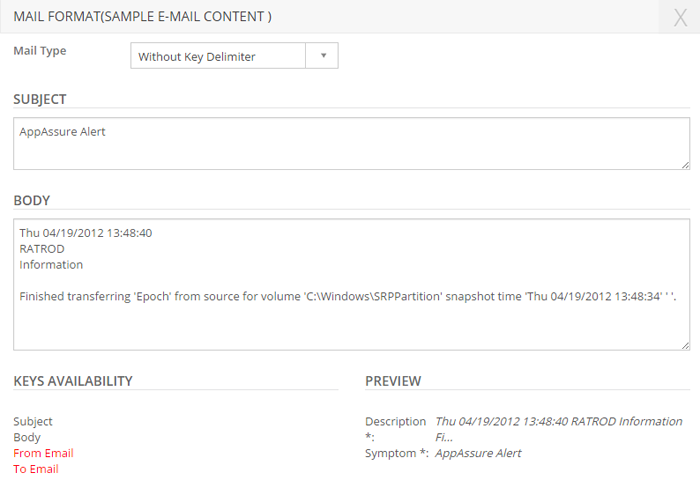
MAIL FORMAT
Click MAIL FORMAT to view the sample e-mail content. The user-defined keys and user-defined key values are displayed as Keys Availability and Preview, respectively, under the Sample e-mail Content. If the defined user-defined key is not available, the key is marked in red color.
MAILBOX
If you click MAILBOX, you are redirected to MAILBOX configuration page. For more information about the MAILBOX page, see Configuring Mailbox.

 icon
icon